

kev
-
Posts
2677 -
Joined
-
Last visited
-
Days Won
58
3 Followers


Recent Profile Visitors
30609 profile views


kev's Achievements
")


-
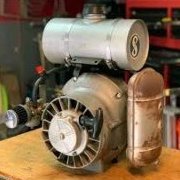
Thanks! No cool photos this week, because I wasn't doing body work. I put the engine back in it. Figured everyone has seen tons of pictures of that. The full engine bay is almost back together. I'm in the process of cleaning up my replacement radiator. I was contemplating having it professionally cleaned but the internals of this thing are looking good. I can also tell that it has been worked in the past...pretty easy because there is a metal tag on it from the radiator shop that did the work haha. I believe it has been re-cored. I'll finish that up this coming weekend and hopefully will turn the key to make sure everything is operational. Then it is on to paint prep of the cosmetic panels, as well as some rust repair in my replacement bumper support. I ordered the paint products on Friday; more epoxy, base, and clear. Still need to buy some new vinyl decals but that can wait a bit. techboy, Rummaging through boxes in my garage for something and ran into a set of oil cooler lines! So, I'll bring yours back next time we meet up. Thanks again! kev
-
Jet Valve O-Rings(?) while doing Valve Stem Seal job?
kev replied to techboy's topic in Virtual Mechanic
Usually, bad valve seals will blow smoke all the time but most noticeably while on acceleration. If it blows after let-off, it's probably blowby past the rings. Clean up the breathing system first and see if that helps. But, yes, there is an o-ring on the JVE kit. So shelby is correct. Have I ever seen one leak though?...no. I don't know the o-ring size but it is most likely a standard dash size being that they are probably Goodson JVEs. They might tell you if you called them, but the kit is only $30. -
Not too much to show after this weekend, although worked on it about equal time as the last few weekends. Just starting to assemble the engine bay. This alone cleaned up my garage a bit. I'm very happy on the color. A little road grime in a few months will match it all well haha. I did find a ding in the blue fender. It's actually pushed outwards, most likely some minor damage from being in storage for years. Fully fixable but I was really hoping the body panels would have been as simple as sand, prime, paint. But good thing is that the header panel is looking that way. So, the big question..if you poked your head under the hood now (not knowing any of the history of this car), would you notice that it was hit? I have since swapped that rusty horn out with the original. These are probably the most interesting of the weekend results..unmasking the wheels. And this was simply unmasking, I still need to do the final polish which probably will wait until I mount the tires. Example 'Before' photo (well after paint stripper): And 'After': (the rim on the left is the same as the one above...which actually was an easier rim because it didn't have curb rash. I forgot to take photos of the initial start on the rear wheels, which had a lot of curb rash and were in overall worse condition) I was really debating the color of the insets...going with a more original gray vs black. Black really does pop on a black car but my goal on this particular car was to retain it stock (although, I have been slowly deviating from this). Obviously, I chose gray. It is an early 90's Honda Pewter Gray, paint code NH-537M, if anyone is curious. Looking forward to seeing them on the car. Speaking of retaining it stock, I believe I made the decision to yank out the A/C system. There was absolutely no freon in there. This car originally was an automatic which has the second condenser...which is mangled up good, someone hit a curb or something in the past (most likely the main source of the leak but I'm sure all the seals and crimped hoses really need to be repaced). I'm not looking to try to revitalize the A/C system at the current time and being that a good portion of it was removed for the repair, I'm going to leave it out and open up the engine bay a bit. Of course, I'll save and store the parts if my mind changes in the future.
-
Time for another update on the weekend's progress: I think you all probably know that I can't leave things alone, haha. I scuffed up the black epoxy. Some of the filler work I did had pin holes in it (as expected because it was such a quick job), so I used a little glaze putty to fill them. Then reshot with serbia black BC. No clear, for I wanted it to have a more of a satin look to match the rest of the engine compartment. I think it came out good, although I still need to unmask to see how close it really is. I still don't like that corner, but I really need to accept it for what it is...for I'm not going back now. Sprayed the headlight bucket as well, which use to be burgundy. The bracket on the left was bead blasted to bare metal, two coats of epoxy and two coats of BC. The bucket itself was just a quick wipe down and one coat of BC (It's fully hidden but didn't like the burgundy overspray on it) And while I had the spray gun out, I decided to work on my project that was in process prior to the collision..refurishing my spare set of 7/8s. I had these all polished up over the winter but needed the insets painted. I really do wonder if the accident would have ever happened if I had finished this project earlier (with new rear tires on). Really curious to see how these look after removing the tape...I haven't touched them since, just letting the paint cure well.
-
Unfortunately, no. But the good is that these transmissions are very easy to remove. 2 bolts for the starter, 1 small bolt/nut for the transition plate, undo the 2 bolts on the clutch slave cylinder, remove the driveshaft, unplug the reverse light/speedo/sensor, and undo the shifter (which probably is the hardest part because you have to take out the center console...or sneak up there from below in the tunnel with a wrench and small hands). Then four tranny to engine bolts and it is out. It's also not too heavy. Regular floor jack is sufficient or even muscle it out by hand.
-
This week's progress: Got the affected areas of the engine compartment in epoxy primer. The first coat laid a good satin finish, but I added two more coats heavy which resulted in some gloss...typical for the primer I use. Normally this is a good thing, but I was trying to get more of a satin look to match the rest of the compartment. I wanted to get the epoxy nice and thick though such that it does its job. I drive this car, it isn't a garage queen like my other cq, so I want the coatings to be durable. Still debating if I'm going to leave it as-is or lay a thin coat of just Serbia Black base (with no clear). That's as far as I went this weekend because I put my attention on my blue cq and got it going for the season (not bad because I did both of these in the same day). Although, I did compare the core support on it to this car (not sure why I didn't do this prior). In all, I probably should have spent more time on that corner to get it looking a bit closer to stock but I'm not fussing with it anymore at this point. Everything lines up and the repair isn't too obvious.
-
This weekend's progress: It doesn't look like much but here is the result of several more hours of work. Basically using some filler to smooth things out. Mostly focusing on that upper right core support that will be most visible when you pop the hood but also putting a little on the frame rail and even on the front sheet metal supports to just mask the crinkled steel a little bit. Also applied seam sealer and did a thorough washing of the engine compartment. Next up is epoxy primer and then paint. My concern now is actually matching the paint. I'm worried BC/CC will put too much of a shine compared to the rest of the engine compartment when is more of a dull black. I'll start with my black epoxy and see how it looks. May just BC the top of the core support with serbia black but not use clear. We shall see, that is next weekend's project. Also, pressure washed off the 'new' body panels to start into the paint prep. May first focus on the engine compartment and getting everything under the hood back together and getting the car running again. I could definitely use the garage space that is being occupied by all of the parts from this car. My other conquest is pretty much trapped in the garage and I haven't yet been able to take it out of winter hibernation as a result. This rail is pretty darn straight now and there isn't much Duraglass or filler in there!
-
Some more updates. Spent a few hours working on the final welding/grinding in the engine compartment. I must have test fit the outer body panels 50 times by now...maybe more! I did run into an interference when I put the black plastic on around the headlight. It was hitting the outermost sheet metal slightly, just enough to rub it a little. Not the biggest deal but being that I only had it tacked in position, I made sure to address it. I popped the tacks and spent some more time reshaping that panel. Plus, with that out of the way, I was able to grind down my welds on the other panel easier. Also, the bolt on the core support for the headlight motor wasn't lining up the best. A couple minutes of work with the slide-hammer resolved that. One thing I'm learning well....test fit, test fit, test fit! Test fit everything, even the smallest part when it comes to a repair like this. Don't want to find issues when everything is all painted and looking good. This is the time to address all of these things, when it still looks ugly haha. This is the ugliest visual of the repair but given the state it was in, I am very impressed I got it bent back and everything lines up. Although, this is the most noticeable spot of the repair (easily seen when you pop the hood). I got the rubber bump stop functional again (not exactly like it was stock but it works). I need to make this look a bit better. I did some welding to build it up and grind it smooth(er) I applied a little Duraglass on a few of the areas to help mask the repair some more. And spraying a coat of quick primer on everything. Still have some work to do to make everything look good before paint, but it is really close now. I also reshaped my air can. The one tab on the body was bent too which required some manipulation but I was able to reshape it without drilling out the spot welds and rewelding. Still have a little sanding to do on the frame rail (mainly just the rolled edge), but the Duragalss took care of the ugly remnants of the 'kink'..hammer marks, etc. I'll also put some seam sealer back in before final prime/paint. i did make a custom nozzle to prime the inside of the frame from where I applied heat. I'll apply paint there too and then follow up with some further treatment when it is all done to inhibit rust in the future. I still have to play with this a bit. Will sand it a little more and get out the body putty..Duraglass is a bit hard to shape the contours. I want this looking better than what it does currently.
-
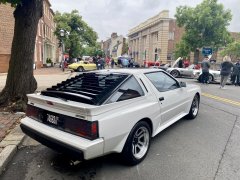
Possibly, it looks like there is a bit more orange peel than what was original especially with how polished this car is. The rear bumper looks how I'd expect it to. I agree though; if you are investing in such a low mile car, you want it all original. Even the tinted windows and black wheel insets detract from the originality.
-
Requesting help for finding a Starion
kev replied to Jim787878's topic in Newbie Question and Answers
There is a starion on fb right now in Maryland for $1000. Has a blown engine and a lot of patina...but they are out there. I've seen several go lately on FB for under $1500, you just have to keep your eye open and be ready to bite as soon as you see one. -
Also, I don't like that version of the TPS/ISC reset that was posted above. I follow the one in this thread (the original posted by KO but is mike c's wording...the 9 steps). I know, there are so many but most have forms of simplification which can run you into problems. Follow mike c's reset procedure to the T.
-
There are many things it could be, but being that things changed after the new injector clips and TB cleaning, I'd place focus here.....but, take into consideration what was said on a previous post. You could be stuck in closed loop. If you unplug the CTS (the one that goes to the ECU and is vertical with the prong facing up) and put a 200 ohn resistor between the two terminals of the plug, it will trick the ECU into thinking the car is fully warm. Obviously, you will have to start the car and let it come to temperature to do further testing...but this will rule out CTS issues as you further diagnose. If still having idling issues, now start going through what you have done. Did you make a mistake on soldering in the injector wires...inadvertently switched a wire, cold solder joint, etc.? Did you replace all o-rings using a TB seal kit and NOT use any type of sealant that could have gotten into an injector port? Did you attempt to do a TPS/iSC reset...probably not being that you can't get it to idle, but have you moved the TPS to see if it makes a difference? Did you inadvertently touch the idle screws on the TB? On that note, there are two idle screws...one for the ISC, which is the primary idle adjustment...the second on the throttle plate itself, which is the secondary that should be set a turn or so less than the ISC to 'catch' it if the ISC allows the idle to drop and not stall the car. Note: there is a popular youtube video out there that shows the incorrect way of setting the idle by turning the fixed idle screw on the throttle plate....although it is incorrect, you can try that first to see if you can get it to idle but know that you will have to go later back it off and go through the TPS/ISC reset procedure in very good detail to get the electronics and the idle properly set right. To me, the new idle issue seems to be either a bad connection on the new injector clips or a blocked injector. Also note that the black injector is known to gum up if you let it sit awhile. The green injector only opens when you push the accelerator, as soon as you let off or hold it still, it will stop spraying. So, if your black injector isn't opening, it will stall out in these conditions. I greatly suspect this is your issue...confirm it and if it is, find the cause..it's either gummed up, not getting the signal to open, or blocked. As to the temp sensor for the gauge, if it is an aftermarket sensor (assuming so since you said you changed it), they are known to have different calibrations. I've tried a couple different aftermarket ones from rockauto and ended up with ones that show the car almost overheating and another that showed it barely heating at all...yet the car was running at the proper temperature. I always ended up back with an old OEM one. I'd also be very cautious on an aftermarket ECU CTS.
-
I do remember that previous one...didn't realize it was the same. Hmm, I wonder why the emblems were changed? Not fond of seeing cars being flipped to make a buck.
-
Weekly update: Spent a few hours on Saturday fine tuning my gaps. I really didn't have to do much with the 'structure' here, I just spent some time adjusting everything. Pulled the bumper off so I could work the fender, headlight, header panel, and hood. Found that the plastic inner fender was messing with me a bit on the fender, so go it out of the way. That allowed me to adjust it into position and get a good fender to hood gap. I will admit that I did open up one of the mounting holes on the header panel to get the header to hood gap more consistent...it is still slightly off. I could cut a few spot welds and try to pull out the sheet metal but I'm worried about further effects of doing this. So, I opened up the one hole slightly to get it within a 1/16" For the hood, a little grabbing and twisting by hand plus a small rubber tap hammer on the one corner did the trick...It's sitting real nice now! And yes, I was able to acquire a black headlight cover for the passenger-side. Actually, got it from the same member whom I got the headlight assembly from. I know I said it before, but these bare steel sheet metal pieces are the original mangled ones which I was able to reshape! Then it was back to the bumper. The yellow tape shown, and the yellow tape on the header panel was the measured center. Last week, I thought the bumper was off center. Turns out the old remnants of the mitsubishi symbol on the header was not on center..creating an optical illusion that things were off. Measuring where they should be and verifying with the laser level gave me confidence in this. Although my bumper mounting holes aligned perfectly, the passenger side gap to the fender was tight, where-as the drivers side was pretty wide. Most likely because the rail is still slightly pushed in. I quickly made the conclusion that I'm probably not going to be able to pull that out without ruining other things, I simply opened up the outboard holes of the bumper support by 1/16" diameter. This allowed me to adjust it in really well. Again, confirming level and with my laser level. Green line is my laser level...wicked close for a plastic bumper cover So, next up was a full front-end mockup. Still haven't picked up the passenger side marker light, but mounted everything I had, including the hood latch assembly. I will say that I had to add a 1/16" shim to the hood latch. It was latching a little high at first. Could probably bend down the bracket slightly to address this, but the shim did the trick. Again, laser level confirming everything. This gap is so much better: Same with this one. If anything, the passenger side is slightly larger now..which can be addressed on final assembly. forgive the broken marker light that is just lying there, angled. But holding the broken marker light in place, I don't see any issues. Of course, will double check it once I get the replacement light. The replacement fender is missing the plastic insert to screw the marker light to...I'll pull that from the damaged fender. Gaps...not perfect but pretty good given the situation. I still will do some adjustments later on during final assembly. I never even touched this headlight..I might eventually push it back just about a 1/16" Haven't done anything to this spoiler besides bolt it up. The collision tore a few of the mounting tabs but it isn't affecting anything. Unfortunately, one crack on the passenger side. I know I said last week that I was going to try to restraighten the original bumper support. After looking at it further, I think that effort will be futile...it's too bent up. I may have to cut my losses on that piece and focus on patching up my spare. Next steps: Going to try to get the marker light some time this week and verify it fits well. From there, everything gets pulled back off. Have a couple welds to do on the more outboard piece of sheet metal and up at the core support. Have to grind down all my plug welds and then it is making everything in the engine compartment look visually better. Again, I backed off on my original goal..I'm not going to get all of this perfect but I want to make it such that the accident isn't noticeable when you pop the hood unless you really start looking close. I do need to test fit the headlight motor assembly..for I used one of the mounting holes as a spot to slide hammer the steel back into position. Plus have to see if I can bend back my air-can and verify alignment. As to paint preps of the body...I originally wanted to spray the entire front clip and passenger door (kind of continuing my respray efforts that I started last year). The passenger door, drivers fender, and hood have many door dings but are original paint. But now that I see everything, I believe I may just paint the off-color parts and get it back to the condition it was. The replacement fender, header panel, and bumper cover have no issues at all..meaning it should just be a good sanding, prime, and spray without hardly any filler. Well, I'll probably fix that crack in the spoiler and respray it along with the bumper. But all the other black parts will probably stay as-is. The grill has two little imperfections (can see them in the close up above), probably from how it was stored for years. Really easy fix but will require a respray...I hate painting these grills and probably will just let it be for this effort.
-
Thanks for posting. Don't have any interest in purchasing but I was using the detailed photos to look close at the gaps in the front end panels (note my recent collision repair post). It's very helpful to see what they were on what hopefully is an unmolested car. Japanese cars have good build quality but did notice some deltas. I saw the decals too, and it does look like there is a bit more orange peel in the paint than what was typically seen in an original car. Although there are scratches, etc. shown in the photos. If it were repainted, it was a while ago. Not sure, but the decals do raise the question. Was there such a thing as a 'later 86 CQ' which had the newer decals? I didn't see a photo of the door tag with the build date. Obviously, the wheels were refurbished given the black insets, but I like how they kept the polished lip around the center cap. For the 86s, I actually really like the black starions that had the red interior (not sure if they had that combo with the conquests?) I remember years back there was a post on here with an original owner selling his 86 starion in this color combo that had 15k original miles on it. The story was that his son, I believe, took it out for a joyride and sideswiped a parked car, damaging the one side of the car. He parked it in a barn for years, hoping to fix it, but offloaded it for like $1200. I wanted that one bad but it was snagged up by another member quick. I bet that thread still exists on here.
