importwarrior Posted May 2, 2015 Report Share Posted May 2, 2015 I still can't believe how amazing this project is. Link to comment Share on other sites More sharing options...
mbruneaux Posted May 2, 2015 Report Share Posted May 2, 2015 Doesn't this project demolish every excuse for not doing just about anything.... Link to comment Share on other sites More sharing options...
'87quest Posted May 2, 2015 Report Share Posted May 2, 2015 I still can't believe how amazing this project is. X2. Awesome job man! Link to comment Share on other sites More sharing options...
autotr8er2 Posted May 2, 2015 Author Report Share Posted May 2, 2015 (edited) And.... She's down! On the frame, that is. http://i1123.photobucket.com/albums/l543/autotr8er/Mobile%20Uploads/B3CF4C72-4DDE-4B12-B4EF-CDB3EBAA6813.jpg Edited May 2, 2015 by autotr8er2 Link to comment Share on other sites More sharing options...
autotr8er2 Posted May 2, 2015 Author Report Share Posted May 2, 2015 Here's a glimpse on how wide the track is going to be.http://i1123.photobucket.com/albums/l543/autotr8er/Mobile%20Uploads/F99C03BE-A51B-4A5B-8D1D-14FB21233B0B.jpg Link to comment Share on other sites More sharing options...
NikoFab Posted May 2, 2015 Report Share Posted May 2, 2015 I have chub Link to comment Share on other sites More sharing options...
autotr8er2 Posted May 2, 2015 Author Report Share Posted May 2, 2015 Not going to be able to slam the car without some major cosmetic changes. I'm not going to go smaller wheels and tires. I'll come up with a sketch or something. Link to comment Share on other sites More sharing options...
autotr8er2 Posted May 2, 2015 Author Report Share Posted May 2, 2015 Doesn't this project demolish every excuse for not doing just about anything.... A saws all helps. Heh, heh Link to comment Share on other sites More sharing options...
autotr8er2 Posted May 2, 2015 Author Report Share Posted May 2, 2015 I still can't believe how amazing this project is. Thanks, man Link to comment Share on other sites More sharing options...
autotr8er2 Posted May 4, 2015 Author Report Share Posted May 4, 2015 Random pic as she sits right now http://i1123.photobucket.com/albums/l543/autotr8er/Mobile%20Uploads/45C5ECF0-D250-4A72-9681-8C32D607E86F.jpg Link to comment Share on other sites More sharing options...
Xtreme Industries Posted May 4, 2015 Report Share Posted May 4, 2015 DAMN, this is sooooooooo awesome. keep up the good work. can wait to see the progress. 1 Link to comment Share on other sites More sharing options...
MPGorBOOST Posted May 4, 2015 Report Share Posted May 4, 2015 I have chubDitto!^ 1 Link to comment Share on other sites More sharing options...
autotr8er2 Posted May 5, 2015 Author Report Share Posted May 5, 2015 Dropped off the steel from the floor to the recyclers. 220 lbs. @ $.04/lb. I walked away with $8.80! Ready for the next upgrade. LOL Link to comment Share on other sites More sharing options...
Xtreme Industries Posted May 5, 2015 Report Share Posted May 5, 2015 220lbs, wow. $8.80 lol. have you figured out how to attach body to frame and what are you going to do about the wider track? Link to comment Share on other sites More sharing options...
aconro Posted May 5, 2015 Report Share Posted May 5, 2015 I love where this project is going!! Cant wait to see what else you come up with. Link to comment Share on other sites More sharing options...
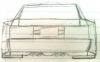
autotr8er2 Posted May 6, 2015 Author Report Share Posted May 6, 2015 (edited) Me too, aconro. It's evolving as engineering challenges arise. @ Extreme. To drop the chassis to the ground. I'll have to make some cosmetic and structural changes. I'm struggling with the concept. Here is a good example of the direction I'm heading. http://i1123.photobucket.com/albums/l543/autotr8er/Mobile%20Uploads/13848795-4D30-4A74-BD21-43ABE07B9824.jpg Edited May 6, 2015 by autotr8er2 Link to comment Share on other sites More sharing options...
autotr8er2 Posted May 6, 2015 Author Report Share Posted May 6, 2015 The fenders will have to be higher than the original hood line. Not sure if I want to go that radical. The body surrounds the frame. It's 1/2 inch narrower than the pinch welds. The ledge of the inner box tubing of the body is resting on the 1/2 square tubing I welded onto the fabricated frame. Once I install the rollcage (reinforcing the body structurally) i'll remove the body and weld in boxing plates. The body will be welded to the frame when all is done and I don't need to lift the body anymore. Link to comment Share on other sites More sharing options...
autotr8er2 Posted May 6, 2015 Author Report Share Posted May 6, 2015 The front and rear existing bumper channels will also be used and welded to the frame. Link to comment Share on other sites More sharing options...
speedyquest Posted May 7, 2015 Report Share Posted May 7, 2015 Heya auto, I have been watching a youtube channel for about a year now and these guys are building a one off custom setup kind of like what your doing. I figured I would give you a link to the videos so you could watch them. I figure it might give you some inspiration plus I can only imagine you will enjoy it just as much as I have. Watch all the project Binky videos. https://www.youtube.com/channel/UCHvBHWBzzB7NyU5tIiEZHBg Let me know what you think. Link to comment Share on other sites More sharing options...
autotr8er2 Posted May 8, 2015 Author Report Share Posted May 8, 2015 Thanks for the tip. These guys are good. Link to comment Share on other sites More sharing options...
speedyquest Posted May 8, 2015 Report Share Posted May 8, 2015 Yea they are. I'm not expecting anything to directly relate to what your building but I thought it might give you some cool ideas or inspire you in some way. Either way I am always a sucker for stuff like this so if you happen to come across anything let me know as well. 1 Link to comment Share on other sites More sharing options...
autotr8er2 Posted May 10, 2015 Author Report Share Posted May 10, 2015 Thanks to Speedyquest. I quickly churned out my Binky Boys frame pickup points. http://i1123.photobucket.com/albums/l543/autotr8er/Mobile%20Uploads/A90F2205-BEA8-4E16-A072-1D0B9931C60C.jpg http://i1123.photobucket.com/albums/l543/autotr8er/Mobile%20Uploads/F718700A-B90B-4B4C-85A1-FDCAC8EFE642.jpg Link to comment Share on other sites More sharing options...
autotr8er2 Posted May 10, 2015 Author Report Share Posted May 10, 2015 Cut out the rear fender wells http://i1123.photobucket.com/albums/l543/autotr8er/Mobile%20Uploads/B158970A-C1A3-4518-BD59-6CD9FFE7812A.jpg http://i1123.photobucket.com/albums/l543/autotr8er/Mobile%20Uploads/2F42FEC5-4BDC-4991-9008-F3016C95389B.jpg Link to comment Share on other sites More sharing options...
autotr8er2 Posted May 10, 2015 Author Report Share Posted May 10, 2015 Prepped the rear frame rails to accept flooring at "stock" height. http://i1123.photobucket.com/albums/l543/autotr8er/Mobile%20Uploads/7F4F69B9-2381-4A7E-98BB-50B1777E101F.jpg Link to comment Share on other sites More sharing options...
autotr8er2 Posted May 10, 2015 Author Report Share Posted May 10, 2015 Comparison of the old stock rear tires versus the vettes http://i1123.photobucket.com/albums/l543/autotr8er/Mobile%20Uploads/39C8E91B-64D7-4630-9C3B-2C55E06EDF2E.jpg Link to comment Share on other sites More sharing options...
Recommended Posts