Lizzord30 Posted November 16, 2011 Report Share Posted November 16, 2011 Awsome work on this!! Have any more Pictures of the Engine like the Exhaust Manifolds/Headers I am very much considering a 6G74 Swap SOHC 24v 3.5L for the Montero (some swap issues will be removed because of it being RWD configuration to begin with I hope)\ PS engine looks awsome! too bad they dont make turbos that spin the other direction so it would be more symmetrical lol Maybe can get some Aussie turbos Link to comment Share on other sites More sharing options...
SFBMX88 Posted November 16, 2011 Report Share Posted November 16, 2011 Just curious what you're using for a master cylinder. It looks shorter and made of aluminum. Link to comment Share on other sites More sharing options...
Bill Hincher Posted December 12, 2011 Report Share Posted December 12, 2011 there is a difference in starter rotation that has been asked about , when you do a reverse starter application, its good to know you rotate the enging in the proper directionhttp://www.billsautofab.com/images/6G72adapterC4bellhousing17.JPG http://www.billsautofab.com/images/6G72adapterC4bellhousing18.JPG I must have torn apart 50 starters looking for length and directionhttp://www.billsautofab.com/images/6G72adapterC4bellhousing19.JPG http://www.billsautofab.com/images/6G72adapterC4bellhousing20.JPG I hated the first starter location, there were two problems with it, first in didnt set the starter between bellhousing bolt boses and relied on only one main bolt station to limlt and deflection in the starter, the other problem was special shifter linkage would have been required http://www.billsautofab.com/images/6G72adapterC4bellhousing22.JPG http://www.billsautofab.com/images/6G72adapterC4bellhousing24.JPG because of the depth of the starter gear, I had a choice. build a custom gear or build the starter body right into the bellhousing, well I hate custom parts, all these parts are available over the counter so I spent the time to place the front of the starter pocket into the bellhousing http://www.billsautofab.com/images/6G72adapterC4bellhousing30.JPG http://www.billsautofab.com/images/6G72adapterC4bellhousing31.JPG http://www.billsautofab.com/images/6G72adapterC4bellhousing32.JPG http://www.billsautofab.com/images/6G72adapterC4bellhousing33.JPG http://www.billsautofab.com/images/6G72adapterC4bellhousing34.JPG http://www.billsautofab.com/images/6G72adapterC4bellhousing35.JPG http://www.billsautofab.com/images/6G72adapterC4bellhousing36.JPG http://www.billsautofab.com/images/6G72adapterC4bellhousing37.JPG http://www.billsautofab.com/images/6G72adapterC4bellhousing41.JPG I should be filling it all in and getting it to casting this month Link to comment Share on other sites More sharing options...
Komeuppance Posted December 12, 2011 Report Share Posted December 12, 2011 PS engine looks awsome! too bad they dont make turbos that spin the other direction so it would be more symmetrical lol Maybe can get some Aussie turbos Haha but they do make "reverse" turbos. Look for an MHI "R" turbo (td05HR, td06HR). -Robert Link to comment Share on other sites More sharing options...
randy Posted December 13, 2011 Report Share Posted December 13, 2011 Man you do some great work. Link to comment Share on other sites More sharing options...
Bill Hincher Posted December 15, 2011 Report Share Posted December 15, 2011 sanding and flowing and sanding and sanding and sanding >;o0http://www.billsautofab.com/images/6G72adapterC4bellhousing42.JPG http://www.billsautofab.com/images/6G72adapterC4bellhousing43.JPG http://www.billsautofab.com/images/6G72adapterC4bellhousing44.JPG http://www.billsautofab.com/images/6G72adapterC4bellhousing45.JPG http://www.billsautofab.com/images/6G72adapterC4bellhousing46.JPG http://www.billsautofab.com/images/6G72adapterC4bellhousing47.JPG http://www.billsautofab.com/images/6G72adapterC4bellhousing48.JPG http://www.billsautofab.com/images/6G72adapterC4bellhousing49.JPG Link to comment Share on other sites More sharing options...
Bill Hincher Posted December 18, 2011 Report Share Posted December 18, 2011 I spend HOURS sanding and shaping and adding and removing material gettig the shape I wanthttp://www.billsautofab.com/images/6G72adapterC4bellhousing50.JPGhttp://www.billsautofab.com/images/6G72adapterC4bellhousing56.JPGhttp://www.billsautofab.com/images/6G72adapterC4bellhousing52.JPGhttp://www.billsautofab.com/images/6G72adapterC4bellhousing53.JPGhttp://www.billsautofab.com/images/6G72adapterC4bellhousing54.JPGhttp://www.billsautofab.com/images/6G72adapterC4bellhousing55.JPG the diagonals are not just for looks, they absorb the twist in the housing and are overlapped to the daigonals on the outside of the housing to keep the overall width of the bellhousing wall about 3/8 inchhttp://www.billsautofab.com/images/6G72adapterC4bellhousing51.JPG Link to comment Share on other sites More sharing options...
Bill Hincher Posted January 7, 2012 Report Share Posted January 7, 2012 I keep trueing the surface flat on the engine side to provide a good datumhttp://www.billsautofab.com/images/6G72adapterC4bellhousing61.JPG http://www.billsautofab.com/images/6G72adapterC4bellhousing62.JPG then I keep using the engine block as a guide to keep everything as straight as I canhttp://www.billsautofab.com/images/6G72adapterC4bellhousing63.JPG http://www.billsautofab.com/images/6G72adapterC4bellhousing64.JPGthe starter pocket was all detailed outhttp://www.billsautofab.com/images/6G72adapterC4bellhousing65.JPG http://www.billsautofab.com/images/6G72adapterC4bellhousing67.JPG I keep using the datum dowel pin I built in the first phase of the build to center the trans sidehttp://www.billsautofab.com/images/6G72adapterC4bellhousing68.JPG http://www.billsautofab.com/images/6G72adapterC4bellhousing69.JPG the interior of the housing worked out very nice and everything lines up correctlyhttp://www.billsautofab.com/images/6G72adapterC4bellhousing70.JPG the diagonals will show up better after casting, I like a little detail so I know my work http://www.billsautofab.com/images/6G72adapterC4bellhousing72.JPG Its pretty close Link to comment Share on other sites More sharing options...
Bag-O-Chips Posted January 7, 2012 Report Share Posted January 7, 2012 Bill, When this is complete.... I am Doing a 6G72 swap. I hate you so much right now. Hahahaha!!! Link to comment Share on other sites More sharing options...
Bill Hincher Posted January 8, 2012 Report Share Posted January 8, 2012 Bill, When this is complete.... I am Doing a 6G72 swap. I hate you so much right now. Hahahaha!!! meeeeeeeeeeeee???????????????? it wasnt MY idea, I was minding my own business, turbo addict is the one who did it Link to comment Share on other sites More sharing options...
Bill Hincher Posted January 13, 2012 Report Share Posted January 13, 2012 its in casting, should have it back soonhttp://www.billsautofab.com/images/6G72adapterC4bellhousing74.JPG http://www.billsautofab.com/images/6G72adapterC4bellhousing75.JPG http://www.billsautofab.com/images/6G72adapterC4bellhousing76.JPG http://www.billsautofab.com/images/6G72adapterC4bellhousing77.JPG http://www.billsautofab.com/images/6G72adapterC4bellhousing78.JPG Link to comment Share on other sites More sharing options...
SteveDSM Posted January 13, 2012 Report Share Posted January 13, 2012 WOW... speechless! all i have to say is AMAZING work and if i could ever swap something else in my Conquest, this is one of the very few i would even consider! Thanks for keeping the innovation and creativity in the community guys Link to comment Share on other sites More sharing options...
Bill Hincher Posted January 13, 2012 Report Share Posted January 13, 2012 nothin to tear your hair out about Steve Link to comment Share on other sites More sharing options...
Bill Hincher Posted January 20, 2012 Report Share Posted January 20, 2012 (edited) this is the first casting, the pattern is on the lefthttp://www.billsautofab.com/images/6G72adapterC4bellhousing79.JPG http://www.billsautofab.com/images/6G72adapterC4bellhousing80.JPGhttp://www.billsautofab.com/images/6G72adapterC4bellhousing81.JPG http://www.billsautofab.com/images/6G72adapterC4bellhousing82.JPG http://www.billsautofab.com/images/6G72adapterC4bellhousing85.JPG http://www.billsautofab.com/images/6G72adapterC4bellhousing86.JPG I hope it works >;o) Edited January 20, 2012 by Bill Hincher Link to comment Share on other sites More sharing options...
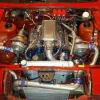
Turbo_Addict Posted January 20, 2012 Author Report Share Posted January 20, 2012 Finally getting back to this - changed jobs and I am not on the road every single week any longer. Woohoo! Anyhow, here is how she stands now. And with Bill and his amazing work, now it's about time to tackle the transmission. Got the intercooler mounted, had to mod all the piping because I mounted a tad higher than the previous car, but I am able to maintain the bumpers integrity this way, and that was important to me. Got the radiator temporarily in place with zip ties and will work on the permanent mounts soon. http://www.26liter.us/gallery/albums/userpics/10156/icpiping1.jpg Link to comment Share on other sites More sharing options...
mb3000 Posted January 20, 2012 Report Share Posted January 20, 2012 Very nice, looking very clean. Link to comment Share on other sites More sharing options...
Bill Hincher Posted January 21, 2012 Report Share Posted January 21, 2012 (edited) http://www.billsautofab.com/images/6G72adapterC4bellhousing95.JPG http://www.billsautofab.com/images/6G72adapterC4bellhousing96.JPGhttp://www.billsautofab.com/images/6G72adapterC4bellhousing97.JPG http://www.billsautofab.com/images/6G72adapterC4bellhousing98.JPGhttp://www.billsautofab.com/images/6G72adapterC4bellhousing99.JPG http://www.billsautofab.com/images/6G72adapterC4bellhousing100.JPGhttp://www.billsautofab.com/images/billsmercsig.JPG Edited January 21, 2012 by Bill Hincher Link to comment Share on other sites More sharing options...
Convette Posted January 21, 2012 Report Share Posted January 21, 2012 Looks awesome T_A can not wait to see videos of this thing... Bill, I am continuously inspired. Link to comment Share on other sites More sharing options...
Bill Hincher Posted January 22, 2012 Report Share Posted January 22, 2012 http://www.billsautofab.com/images/6G72adapterC4bellhousing105.JPG http://www.billsautofab.com/images/6G72adapterC4bellhousing106.JPGhttp://www.billsautofab.com/images/6G72adapterC4bellhousing107.JPG http://www.billsautofab.com/images/6G72adapterC4bellhousing108.JPGhttp://www.billsautofab.com/images/6G72adapterC4bellhousing109.JPG Link to comment Share on other sites More sharing options...
randy Posted January 22, 2012 Report Share Posted January 22, 2012 What numbers are ya looking to get out of that? Good work man looks boss. Link to comment Share on other sites More sharing options...
Bill Hincher Posted January 22, 2012 Report Share Posted January 22, 2012 (edited) I can't put a number to the time involved but I need to build it in kit form and figure out what it will cost, I have some new dies for my equipment being built now so I can do the job better/faster This will come with the starter, housing and flexplate sooooooooooooo If I was a betting man I would put it in the $600.00 range but there is a lot more coming, the water pump conversion is needed for this engine for this to work and I have a few suprises Edited January 22, 2012 by Bill Hincher Link to comment Share on other sites More sharing options...
Bill Hincher Posted January 25, 2012 Report Share Posted January 25, 2012 the original starter motor arriangement on all these starters are just two bolts, I have changed that to use all 4 bolts to attach the starter to the sandwich platehttp://www.billsautofab.com/images/6G72adapterC4bellhousing110.JPG http://www.billsautofab.com/images/6G72adapterC4bellhousing114.JPGbecause of weight and drafting considerations, I knew a plate would have to be placed in the starter placement so a bolt could be attached to the rear of the starter motorhttp://www.billsautofab.com/images/6G72adapterC4bellhousing116.JPG http://www.billsautofab.com/images/6G72adapterC4bellhousing117.JPG Link to comment Share on other sites More sharing options...
randy Posted January 25, 2012 Report Share Posted January 25, 2012 Bill you're a master machinenist. Link to comment Share on other sites More sharing options...
Bill Hincher Posted January 25, 2012 Report Share Posted January 25, 2012 Bill you're a master machinenist. just a fabricater, with a lot of friends that grew up in this kind of work Link to comment Share on other sites More sharing options...
randy Posted January 25, 2012 Report Share Posted January 25, 2012 That is one nice trade my hat is off to you. Keep up the excellent work on those projects. Link to comment Share on other sites More sharing options...
Recommended Posts