

techboy
-
Posts
2187 -
Joined
-
Last visited
-
Days Won
83
Recent Profile Visitors
29763 profile views


techboy's Achievements
")


-
I saw this on eBay as well. Pretty cool looking if you ask me. I was thinking about bidding, but didn't in the end. I did see they sold though. Most of you already know, but Autoworld (rebranded Johnny LIghtning) continues to release various colors of the Starion/Conquest casting which is really well done. There's a limited edition black one I picked up too. I don't have the yellow one yet, I think that's the latest color.
-
I had a 1G BOV installed on my car since I built it and I had running rich and driveability issues for years I could never figure out. I tackled the throttle body and tried different injector setups and could just never get the car to run right. Finally, I think it was kev who said you know those 1G BOV are known to leak? Try recirculating it. I made up a temp recirculation and it fixed all my problems instantly. I was losing metered air and ECU was going bonkers I guess. I came up with a more permanent solution and have run it ever since. I can post some pics of how I did it tomorrow.
-
Cant wait to see pics of it installed!
-
I agree with Crash. Bad shaft seals could certainly allow some smelly gases to escape, but I highly doubt it would be enough to classify as really bad or strong that you'd pick up in the cabin while driving. Shaft seals are about the diameter of a dime. You either have a exhaust manifold crack or it might be as simple as a exhaust gasket. Depending on your downpipe setup there's 2 joints - one at the turbo and one a bit lower by the trans. Also, if you don't find anything there - other things to consider - there is an oil feed line and coolant fed lines on the turbo that can weep or leak under boost and burn off on the hot turbo and create some pretty bad smells. My recommendation would be to buy a turbo gasket set and some exhaust gaskets, take everything apart, inspect your manifold thoroughly and reinstall everything with fresh gaskets.
-
That's a shame for all of us.
-
I thought MKS had some back in stock a while back .. is he out again? They are becoming a problem to find.
-
Like Crash said, the intake manifold has a bunch of metal and soft lines on it under the throttle body, which is right above the starter. It sounds like one of those hoses is split, off, or just worn out. Could be a crack or rust hole in on of the metal lines too. I highly doubt your block is cracked. By "circle" on the side of the block, you might br referring to a freeze plug. Coolant will definitely pour out of there. Plugs are pretty easy to replace, but you may have to remove accessories to get to it.
-
I mentioned in an earlier post above I sent a spare intake out over the winter to have powder coated. When I built my first engine I originally had one done in wrinkle red, which looks pretty awesome, but I went a different direction with the color scheme when I was restoring this car, so I want to get this swapped out and rebuild the TB at the same time. Had a bunch of spare TB parts powdered (and my turbo cold side) in the same blue I used on front cover. I re-assembled the TB over the winter and detailed that in another HOW TO post if your interested in learning how to rebuild a Starquest TB. This is it all together. Time to get this assembly removed. It's been operating great, but the new setup is going to look so much better. Once you remove the fuel lines and coolant lines it's pretty easy to pop off. Here it is removed. Time to get the new one on. Started by bolting down the thermostat housing with a fresh gasket. Fresh intake gasket. Bolted up. Now its a matter of bolting the TB onto the intake. And since everything here is fresh ... it's time for a TPS Reset procedure. I wont' go through that here either, there's lots of documentation about it on the forum. Magic number you're looking for is a .5V.
-
Car has been running great since swapping out the pump - pressures have been much consistent on the gauge. Had a pretty cool night tonight. I took the car to a local show and ran into the man that sparked my interest in these cars back when I was a teen. He was a head cook at the time at a restaurant I worked at and he an 88 Durban. I thought it was the coolest car I'd ever seen and I vowed that one day I would own one. Took me another 14 years, but I did finally get one, restore it, and I was a pretty awesome full circle moment to run into him again. Unfortunately he no longer has his.
-
As I've been driving the car this summer to various shows and whatnot I've been keeping close eye on the oil pressure gauge and I've noticed some times where it really bounces around and gives me some odd readings. I posted a few videos about it on YouTube. Anyway, it's making me nervous so I'm going to swap out the oil pump. I used the original to this motor when I rebuilt this motor the 1st time back in 2010 - but I'm not 100% sure how many miles are on it. I have the pump that was original to this car that I know only has 58k on it, so I'm gonna swap that one on. Picked up all the gaskets necessary. Didn't really want to do this - but better safe than sorry - started tearing things down. Took the valance, front bumper, header panel and IC off to give myself max room. Popped the front cover off. Let's open it up and take a look inside. Here's the inside with the pump gears out. You can see between where the gears sit there is some scoring in the case which I believe was leading to some pressure drop. This pump was definitely on it's way out. At some point I'd really like to pick up a spare new pump from Dad to have as a backup. Just in case.
-
Hope everyone had a great day yesterday! Merry Christmas and get yer Starquest on the road this year!
-

HOW TO: 1G MAS Install / Upgrade
techboy replied to techboy's topic in Engine, Exhaust/Intake, Turbo
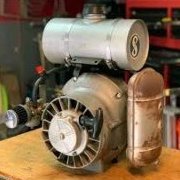
PART TWO: In Part two of this I'm going to show what I did for my actual intake install, this is just what I did though, there are several options out there, so don't take this to your grave. So, like I said above, you're going to need a 1G MAS off of a turbocharged Eclipse, Talon or Laser. You can find these a few places. DSM boards that are still active have some in the F/S section from time to time, Ebay, and the occasional junkyard, although finding a 1G turbo in a junkyard these days is getting tough. When you find one, it should look like this: You can install them just like that, you'll just need to fab up some sort of mount support for it, which many on here have done. K&N used to make an air filter that clipped right to the lid back in the day. You just had to curl the metal clips a bit tighter to make it hold - I don't know if that's still available anymore, 1G's ruled a lot of years ago now. The other option is you can by one of the COSMO units off eBay, which is what I did. This gives you a nice cone filter and polished lid. It's a bit overpriced IMO, and it doesn't work very well with a stock MAS since you have to modify it by drilling new holes to make it work even though they advertise as such. It's up to you. First, it comes in a nice little snazzy box. Here it is out of the box, comes with install instructions. First thing you need to do is remove the MAS from the 1G lid. It's pretty obvious, just remove all the screws on the top with a standard screwdriver. Once you have the 1G MAS separated you need to install it on the COSMO provided lid. There's a gasket they give you that goes in-between. You're supposed to reuse the screws from your 1G MAS, they don't give you new ones. I didn't want to do that and had these allen keys out in the garage from something. I think they're M5's if I remember right, if not, I'll edit the post later. Re-assemble: Now you attach the cone filter with the screws they do actually provide you. All done: When you go to install this on your car, you'll notice the vacuum nipple they provide is kinda in a crappy spot. The OEM port is on the face of the lid, this one is in the crevice of where the coupler attaches ... which of course makes it hard to get to the coupler on well. I trimmed a "V" shaped notch in my coupler. I also used the provided aluminum bracket to fashion a support for the assembly. I had to modify it bit. I cut it shorter and drilled my own holes, but it turned out like this: Here's the whole entire thing installed with the 1G connector I discussed above. (BTW, that's a MK1 silicone intake coupler I bought awhile back install on there in case you're wondering). And, to close out, here's a side by side comparison of the SQC and 1G MAS side by side. You can see the honeycomb area on the 1G MAS is a larger area, hence the upgrade. -
PART ONE: First, lets acknowledge that there are lots of other posts and threads on how to upgrade to a 1G MAS. If you are considering doing this modification, you'll want to read through the 1G Turbo MAS conversion thread located in Fuel/ECU System FAQ located here: 1G MAS Upgrade If you read through that thread you'll see in Post #19 zactek mentions swapping the pins on the SQC harness with the pins on your 1G harness, but doesn't really get into specifics ... that's what this is going to cover. To begin with, you are going to need a 1G MAS obviously, and 1G wiring connector. The beauty about doing it this way is the connector doesn't have to be a turbocharged car b/c we're removing the pins anyway. This opens up your junkyard searching to just about any early Mitsu vehicle that had a 8 pin MAS connector. 1G MAS (MUST be from a turbo-charged model) Wiring connector harness; You're really only going to need one tool to do this - a dental pick. It took me several hours and multiple evenings to figure out how to do this and what tool was best, so, hopefully this will save you all some time. Here's where it's going to get hard to "show" you want to do. You'll have to just try this out yourself and get the feel for it. There is a slot in the middle of the connector. Each metal connecting pin is held in place by a very small plastic clip, or finger. You need to get the dental pick between the pin and clip, pry slightly up and pull the pin out by the wire at the same time. It's not easiest thing to do, but once you figure it out and do a few you'll get a knack for it. If you look down in the slot with a decent flashlight you might be able to see the little clip/finger thing I'm describing. Because we're not interested in the wires in this case, you just remove them from the connector and discard them. Continue one by one until all the wires/pin are removed you have just the connector in your hand. Now, on the SQC side of things, we do have pay attention to wiring. For this, I'm going to use the same numbering system as the thread mentioned above to keep things consistent. However, in that thread the numbers are provided looking at the back of the connector where the wires enter. I never really look at connectors that way, I'm usually holding them in my hand looking at them from the front, so I made my own diagram to help keep things straight. Below is the connector on your Starquest looking at it face-foward with the associated wire colors. Below that is the 1G connector. We're going to connect 1 to 1, 2 to 2, and so on. Basically, the unused pin and 7 aren't used at all, so the right two slots will be empty. Now, it's time to repeat the process, except in the engine bay of your car. Hopefully you've had good practice removing them from the loose connector on your workbench b/c working in the engine bay is a little more challenging. Here's my first pin removed. Top right White/Black A few more removed: All of them removed: You may want to plug each one in right away as you remove them, I didn't b/c I had my pinout sketch to look at to make sure I had everything right. In the picture above I thought I had them all separated correctly in order, turns out I had the Red and White/black flipped on the left side there. I caught it before I installed them. To install them all you have to do is carefully slide them back into the 1G connector, you'll feel a little "click" and that's it, they're locked in place. No hacking, soldering, shrink wrap or anything. Just a dental pick and a steady hand. Here are the wires re-installed into the 1G connector.
-
Now that this car is up and running one of the first upgrades I wanted to do is swap out the SQC MAF for a IG MAS. If you're in how to do this in detail, I'm going to do a full instructional write-up here: 1G Conversion Write-Up Obviously the first thing you need to in order to do this is a 1G MAF which I tracked down on the DSM site I belong to. I also purchased a COSMO Racing intake off eBay. I believe these are made in Canada. It doesn't seem like they make a lot of SQC stuff, but they at least make these. I purchased this one over the winter. I mounted up the IG MAF to the COSMO mount plate. Then I mounted up the Intake. I ended up having to cut a notch in my silicon coupler to make it fit around this breather hose properly. After some trial and error and maneuvering, things ended up looking like this.
-
Looking for wholesaler of Steel braided brake lines
techboy replied to Dad's topic in Just plain ol' B.S.
Id love to swap over to steel braided lines if we could get these made.
