IntercooledFlatty Posted November 16, 2011 Report Share Posted November 16, 2011 what a sweet flatty Quote Link to comment Share on other sites More sharing options...
pc85 Posted November 16, 2011 Author Report Share Posted November 16, 2011 what a sweet flatty Got to agree with you, not too shaby if I may say so myself. Quote Link to comment Share on other sites More sharing options...
danmanTSI Posted November 17, 2011 Report Share Posted November 17, 2011 Very clean build, it seems nothing was skipped over! Where did you get you airdam? Dan Quote Link to comment Share on other sites More sharing options...
pc85 Posted November 17, 2011 Author Report Share Posted November 17, 2011 Its an '89 wide body air dam with the ends by the fender wells tucked in. BTW like your Flatty, what year? Brings back memories, I had the same rims originally. Quote Link to comment Share on other sites More sharing options...
danmanTSI Posted November 18, 2011 Report Share Posted November 18, 2011 Mine's an 84 LS. Do you have any details on the 88 airdam? Did you heat up the sides with a heat gun to fit them to the fenders? Looks like you got it to fit perfectly! FlaTTy LOVE Quote Link to comment Share on other sites More sharing options...
pc85 Posted November 18, 2011 Author Report Share Posted November 18, 2011 (edited) Mine's an 84 LS. Do you have any details on the 88 airdam? Did you heat up the sides with a heat gun to fit them to the fenders? Looks like you got it to fit perfectly! FlaTTy LOVE Wow '84, looks bran new! It's an '89 not '88 and was actually cheaper (like $300-7 yrs ago at a Mitsu dealer) than the 3 piece. It's not heated or treated specially, just made some brackets out of aluminum straps, cut and formed to fit, screwed to the corners to pull in the ends and bolted to the undercarriage. The end is a little longer than the fender and extends a little over 1/4" into the tire well, no biggy , love the look with the IC.http://i849.photobucket.com/albums/ab51/pc85dr/IMG_0337-1-1.jpg Edited February 7, 2012 by pc85 Quote Link to comment Share on other sites More sharing options...
danmanTSI Posted November 19, 2011 Report Share Posted November 19, 2011 Looks great! I think I may have to try that. Quote Link to comment Share on other sites More sharing options...
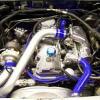
pc85 Posted November 28, 2011 Author Report Share Posted November 28, 2011 Got her home, finally!!! She's about 95% needs a little tuning, running very rich. Looks incredible but not running as good as she looks yet. The morning after I picked her up, wouldn't start, she flooded, had to unplug injectors, clear cylinders, play with gas pedal and finally got her started. So next step is Swift Racing Technologies in D.C. for fine tuning and Dyno test., should put out >300 hopefully 350 hp. Quote Link to comment Share on other sites More sharing options...
mbruneaux Posted December 23, 2011 Report Share Posted December 23, 2011 I usually don't like stripes but I really like yours, looks great. And the car is awesome congrats. Quote Link to comment Share on other sites More sharing options...
pc85 Posted January 4, 2012 Author Report Share Posted January 4, 2012 Thanks, always liked how it ties in with the IC from the front. Quote Link to comment Share on other sites More sharing options...
danmanTSI Posted January 5, 2012 Report Share Posted January 5, 2012 (edited) Updates...........lol, if any with this crappy PA weather? Edited January 5, 2012 by danmanTSI Quote Link to comment Share on other sites More sharing options...
pc85 Posted January 5, 2012 Author Report Share Posted January 5, 2012 Exactly, Its time for a Winter break. I'll be taking the tires/rims off, getting her up on jack stands. Have to work on establishing exact off-set for some custom 17" rims. In the Spring, taking her down to D.C for some fine tuning at SRT (Swift Racing Technologies). For us Mid-Atlantic guys, they are a custom high performance shop dedicated to Japanese cars, they can fabricate almost anything and are Haltech specialists for my ECU. Quote Link to comment Share on other sites More sharing options...
pc85 Posted February 7, 2012 Author Report Share Posted February 7, 2012 (edited) OK, time for a little catching up. Here are some pics of the calipers I had powder coated when I overhauled the brakes. All new TEP rotors and pads. After the paint job, this was the second phase of the resto finished in Summer of '08 almost four years ago.Front passenger side:http://i849.photobucket.com/albums/ab51/pc85dr/85%20Revived/IMG_1044-1.jpgTEP kevlar padshttp://i849.photobucket.com/albums/ab51/pc85dr/85%20Revived/IMG_1049.jpgTEP SS brake lineshttp://i849.photobucket.com/albums/ab51/pc85dr/85%20Revived/IMG_1046.jpgdriver's side, fronthttp://i849.photobucket.com/albums/ab51/pc85dr/85%20Revived/IMG_1047.jpgTEP kevlar padshttp://i849.photobucket.com/albums/ab51/pc85dr/85%20Revived/IMG_1048.jpgTEP SS brake lineshttp://i849.photobucket.com/albums/ab51/pc85dr/85%20Revived/IMG_1051.jpgpassenger side, rearhttp://i849.photobucket.com/albums/ab51/pc85dr/85%20Revived/IMG_1116.jpghttp://i849.photobucket.com/albums/ab51/pc85dr/85%20Revived/IMG_1126.jpgTEP SS brake lineshttp://i849.photobucket.com/albums/ab51/pc85dr/85%20Revived/IMG_1117.jpgdriver's side rearhttp://i849.photobucket.com/albums/ab51/pc85dr/85%20Revived/IMG_1122.jpghttp://i849.photobucket.com/albums/ab51/pc85dr/85%20Revived/IMG_1125.jpgTEP SS brake lineshttp://i849.photobucket.com/albums/ab51/pc85dr/85%20Revived/IMG_1123.jpgWow, how time flies almost four years ago and I thought I'ld be done by now and I'm only half way there. Still need:1, Rims and tires2, Custom interior/stereo3, New paint job. Edited February 10, 2012 by pc85 Quote Link to comment Share on other sites More sharing options...
pc85 Posted February 7, 2012 Author Report Share Posted February 7, 2012 (edited) Got a chance to take some pics of jolyrgr's 3" SS exhaust while the car is up for the Winter:New Innovate wideband O2 sensor, adequate distance from turbohttp://i849.photobucket.com/albums/ab51/pc85dr/85%20Revived/IMG_1127.jpghttp://i849.photobucket.com/albums/ab51/pc85dr/85%20Revived/IMG_1118-1.jpgonly issue with the fitment, a little close to the sway barhttp://i849.photobucket.com/albums/ab51/pc85dr/85%20Revived/IMG_1121.jpghttp://i849.photobucket.com/albums/ab51/pc85dr/85%20Revived/IMG_1120.jpghttp://i849.photobucket.com/albums/ab51/pc85dr/85%20Revived/IMG_1119.jpgOverall very tight fit and incredible sound. Edited February 11, 2012 by pc85 Quote Link to comment Share on other sites More sharing options...
pc85 Posted February 9, 2012 Author Report Share Posted February 9, 2012 (edited) Had some time for a little upgrade while its up for the Winter: Hood Struts!MotoCam360's complete kithttp://i849.photobucket.com/albums/ab51/pc85dr/85%20Revived/IMG_1102.jpgMarked measurements on painters tape, much easier to see.http://i849.photobucket.com/albums/ab51/pc85dr/85%20Revived/IMG_1103.jpgScrew hole, make sure its CENTEREDhttp://i849.photobucket.com/albums/ab51/pc85dr/85%20Revived/IMG_1107.jpgPassenger side struthttp://i849.photobucket.com/albums/ab51/pc85dr/85%20Revived/IMG_1108.jpgBrackethttp://i849.photobucket.com/albums/ab51/pc85dr/85%20Revived/IMG_1109.jpgPassenger side strut assemblyhttp://i849.photobucket.com/albums/ab51/pc85dr/85%20Revived/IMG_1111.jpgDriver's side strut assemblyhttp://i849.photobucket.com/albums/ab51/pc85dr/85%20Revived/IMG_1110.jpg"Look Mom, no bar"http://i849.photobucket.com/albums/ab51/pc85dr/85%20Revived/IMG_1112.jpgThis is a must have for all, easy bolt on took me one hour total instal time. Love it!!! Edited February 9, 2012 by pc85 Quote Link to comment Share on other sites More sharing options...
pc85 Posted March 15, 2012 Author Report Share Posted March 15, 2012 (edited) OK so decided to do some detailing, moved some things around to de-clutter and and take care of some loose ends.Changed all the t-bolt clamps on the HPs for standard hose clamps. Call me crazy but they're much easier to adjust and a lot less bulky, so they're gone.Moved power steering reservoir to front by AHP. Was in the passenger side with the Greddy boost controller solenoid, Innovate wideband; too muchhttp://i849.photobucket.com/albums/ab51/pc85dr/85%20Revived/IMG_1108.jpghttp://i849.photobucket.com/albums/ab51/pc85dr/IMG_1158.jpgRelocated rad overflow tank to a more OEM positionMounted A/C idler armhttp://i849.photobucket.com/albums/ab51/pc85dr/85%20Revived/IMG_1140.jpghttp://i849.photobucket.com/albums/ab51/pc85dr/85%20Revived/IMG_1141.jpgChanging heavy plastic fan for an aluminum Flex-lite fanhttp://i849.photobucket.com/albums/ab51/pc85dr/85%20Revived/IMG_1142.jpghttp://i849.photobucket.com/albums/ab51/pc85dr/85%20Revived/IMG_1143.jpghttp://i849.photobucket.com/albums/ab51/pc85dr/85%20Revived/IMG_1144.jpgHave a clearance problem, need to make a spacerhttp://i849.photobucket.com/albums/ab51/pc85dr/85%20Revived/IMG_1145.jpgStarted going through remnants of stock harness. Uncovered 27 yrs of grease and grim.http://i849.photobucket.com/albums/ab51/pc85dr/85%20Revived/IMG_1147.jpgFished out harness saving 4 wires.http://i849.photobucket.com/albums/ab51/pc85dr/85%20Revived/IMG_1152.jpghttp://i849.photobucket.com/albums/ab51/pc85dr/85%20Revived/IMG_1153.jpgGood buy junkhttp://i849.photobucket.com/albums/ab51/pc85dr/85%20Revived/IMG_1154.jpgWrapping new harness.http://i849.photobucket.com/albums/ab51/pc85dr/85%20Revived/IMG_1155.jpghttp://i849.photobucket.com/albums/ab51/pc85dr/85%20Revived/IMG_1156.jpgFound relay with 2 wires clipped, 1 wire still connected? What's this relay for anyway.http://i849.photobucket.com/albums/ab51/pc85dr/85%20Revived/IMG_1159.jpgAnd found this fuse relay clipped on 1 of the 2 red wires.http://i849.photobucket.com/albums/ab51/pc85dr/IMG_1160.jpgCan someone let me know if those clipped wires have anything to do with the relays/fuse working properly?Started tucking the new harnesshttp://i849.photobucket.com/albums/ab51/pc85dr/85%20Revived/IMG_1157.jpgGrease is gone, clean but not the right color? Supposed to be Kona blue, looks like someone took a lot of short cuts LOL.http://i849.photobucket.com/albums/ab51/pc85dr/85%20Revived/IMG_1162.jpgStill have to work on the spacer for the fan. Edited March 18, 2012 by pc85 Quote Link to comment Share on other sites More sharing options...
pc85 Posted March 18, 2012 Author Report Share Posted March 18, 2012 Finished tucking new harness and got around to finishing the spacer. Last weekend got some longer bolts, spacers to fit over bolts and mounted fan but it looked like some big flying saucer on 4 stilts. Being the home improvement guy that I am, went down to my shop and found something to beef up the little stilts:http://i849.photobucket.com/albums/ab51/pc85dr/85%20Revived/IMG_1164.jpgThat's right MDF, LOL! One was too thin so I glued a second for a total of 1 1/2" then cut it down to exactly 1 1/4".http://i849.photobucket.com/albums/ab51/pc85dr/85%20Revived/IMG_1165.jpgPlaced the spacers through mounting holeshttp://i849.photobucket.com/albums/ab51/pc85dr/85%20Revived/IMG_1169.jpgand wrapped the MDF puck in metal tapehttp://i849.photobucket.com/albums/ab51/pc85dr/85%20Revived/IMG_1170.jpgMounted fan with plenty of clearance. All the stress is on the metal spacers and washers, the MDF puck is more of a filler and stabilizer for the metal spacers. And it looks better. This will be a temporary solution untilI find a machine shop to make an complete spacer out of aluminum.http://i849.photobucket.com/albums/ab51/pc85dr/85%20Revived/IMG_1171.jpghttp://i849.photobucket.com/albums/ab51/pc85dr/85%20Revived/IMG_1172.jpgHope this works. Quote Link to comment Share on other sites More sharing options...
StarquestRescue Posted March 18, 2012 Report Share Posted March 18, 2012 I think that fan is on backwards. Are there any instuctions that say it ok to mount it that way? I see a sticker on it? Quote Link to comment Share on other sites More sharing options...
pc85 Posted March 19, 2012 Author Report Share Posted March 19, 2012 Your right, back to the drawing board.Thanks John Quote Link to comment Share on other sites More sharing options...
Killtodie Posted March 19, 2012 Report Share Posted March 19, 2012 no shroud or? Quote Link to comment Share on other sites More sharing options...
pc85 Posted March 19, 2012 Author Report Share Posted March 19, 2012 no shroud or?No radiator either, haven't finished the re-instsall. Quote Link to comment Share on other sites More sharing options...
Killtodie Posted March 19, 2012 Report Share Posted March 19, 2012 But you will be using a shroud with that flex fan? I have a flex fan I bought some time ago and want to put it to use, wondering about fitment. Quote Link to comment Share on other sites More sharing options...
pc85 Posted March 20, 2012 Author Report Share Posted March 20, 2012 (edited) Shroud definitely. Fitment is fine, mine is a 17" and the shroud fits perfectly. But you will have to space it out about 2' from the pulley like I did and BTW make sure you mount it in the right direction LOL. Rookie mistake. Edited February 9, 2013 by pc85 Quote Link to comment Share on other sites More sharing options...
pc85 Posted March 21, 2012 Author Report Share Posted March 21, 2012 Rims are in, found 4 big boxes by the front door yesterday . Will post pics tonight. Quote Link to comment Share on other sites More sharing options...
pc85 Posted March 22, 2012 Author Report Share Posted March 22, 2012 This what came in:http://i849.photobucket.com/albums/ab51/pc85dr/85%20Revived/IMG_1180-2.jpghttp://i849.photobucket.com/albums/ab51/pc85dr/85%20Revived/IMG_1181-2.jpgMounted for clearance and fitment:http://i849.photobucket.com/albums/ab51/pc85dr/85%20Revived/IMG_1191-2.jpgNow just got to get some tires on those bad boys. Quote Link to comment Share on other sites More sharing options...
Recommended Posts
Join the conversation
You can post now and register later. If you have an account, sign in now to post with your account.