
dtownmikebrown
-
Posts
38 -
Joined
-
Last visited
Content Type
Profiles
Forums
Calendar
Gallery
Everything posted by dtownmikebrown
-
 I'd be interested in having a look. Is this coming out of an 87?
 -
I've got $500 and a battery. I can be there in an hour!
-
Radio...did I fry it?
dtownmikebrown replied to dtownmikebrown's topic in Newbie Question and Answers
I think the ETACS is fine because everything that it's supposed to control is working, and nothing's acting weird other than the radio. I'll have to take a closer look at the inside of the radio, I guess. -
I've got a stock radio inside my '87. ' A few months ago, almost everything was working fine. I had the radio on and when my friend opened the passenger door it turned off. Later I found out that I had the trickle charger hooked up backwards. While I had the dash out of the car to clean up after the mice, I popped the bottom panel off of the head unit and found that one of the fuses was blown. I replaced the fuse. Since then I've replaced all the fusible links and serviced all the grounds. Now the dash is back in and to my surprise everything is working flawlessly except for the radio. Even a few features that didn't work before, like the rear defroster and the adjustable intermittent wipers, are all functional. Now the radio turns on, but no sound comes out. The backlight that operates along with the rest of the interior lighting system now comes on, but many of the lights for the radio itself (LCD backlight, EQ lights, etc) that worked before don't turn on with the radio anymore. The clock is working and it still tunes to stations and saves presets, so I know it's getting power. So, what's the verdict? Is it dead?
-
5th annual Midwest, Northern Indiana and beyond meet
dtownmikebrown replied to wrngwae's topic in StarQuest Meet Planner
Sounds like a good goal to shoot for. I'd definitely like to attend if I can get my car together in time. -
Moving right along! I'm really interested to see what you come up with for the v-mounting. Do you have any other projects that you're referencing, or are you doing it from scratch?
-
Thanks!
-
Nice. Can't wait to see some pics. I've seen quite a few other Michigan people (myself included) active on the SQC forum in the past few months. Maybe it's time to organize a regional meetup, eh? I also found mine in a barn over the winter and I'm in the process of rebuilding and restoring it right now. Drop me a line if you need any help.
-
Yes, you guys both recommended I do that already on my previous thread and I agree that it is an excellent idea. I tried to get them loose with a flare wrench, PB blaster, a torch, and I can't get either of them to budge. They're stuck on, HARD. Since I'm discarding the old lines anyway, why not just cut off the lines right above the flare nuts so I can get an impact socket on them?
-
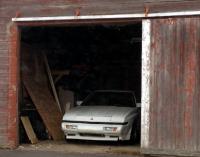
Seeing as how I've had to read the entire FSM cover-to-cover at least twice by now, I think it's time for me to stop spamming the newbie section and start up a proper restoration thread. Here's the back story. I had been interested in owning a Starion for a while, and I happened to stumble across one left behind in a barn a few miles south of Lansing, MI. The asking price was irresistible, so I picked it up. From what I gathered, it had been sitting there since 2009. The previous owner did get it running again, but not for long. I don't know how long it had been sitting before he got his hands on it. If I had to guess, I'd say it was a pretty friggin long time. http://i30.photobucket.com/albums/c331/dtownmikebrown/Starion/1655169_10151989778821659_754050729_o.jpg All it needed was some new rear brakes, a fuel pump, and a secondary injector, and it would be good to go. I figured I'd get it fixed up quick and have some fun with it over the summer before embarking on the full restoration project over the winter. That was the fantasy, at least. Of course diagnosing one problem led to another, which led to another, and so on. Ultimately, I had to pull the engine and transmission for a full rebuild. Same thing happened with the interior, where one funky smell led to another, and I ended up having to pull the entire thing apart. Multiple ecosystems were uncovered. Fascinating stuff. It's been an adventure so far. Every single seal, gasket, o-ring, vacuum line, you name it, I never found a single one that wasn't at least questionable. Many of them were completely shot. I guess that's what happens when you leave a car sitting in a barn indefinitely. Meanwhile, the secondary injector was one of the only things that DID work properly. Right now I'm waiting on the machine shop to clean and inspect my block, head, and rods. My new goal is to get it all back together (hopefully on coilovers) at least a week in advance of the Labor Day autocross at Grattan Raceway. I'd say it's ambitious, but not impossible. The biggest obstacle right now is the $$$. Either way, this thing will be going fast and looking good long before the snow flies.
-
Still not working...
dtownmikebrown replied to dtownmikebrown's topic in Newbie Question and Answers
Too late. It's out! -
Still not working...
dtownmikebrown replied to dtownmikebrown's topic in Newbie Question and Answers
OK, I'm gonna do what I should have done months ago and pull the motor. I really don't think there's anything wrong with the bottom end, but I was planning on building it anyway so now seems like as good a time as any to get the block all checked out, do the BSE and timing chain service, add some forged pistons, etc.. I'm planning on hoisting the block using two head bolts, some larger washers, and about 3.5 feet of high test chain since the head is already removed. I've looked around and it seems like some people on here have had success using that method. So far I've drained all the fluids, took out the radiator and water pump, removed all the hoses and electrical connectors, took out the AC and starter. Also removed a total of 4 bolts between the block and and the transmission, and freed the bolts for the motor mounts. Seems like it should be ready to go, so what am I forgetting? Is there anything else holding things together underneath that I'm overlooking? -
Still not working...
dtownmikebrown replied to dtownmikebrown's topic in Newbie Question and Answers
Haha! All these little problems keep uncovering bigger and bigger problems. Can't wait to see what I find next. I made a mess of the head trying to drill out the broken exhaust stud, and then while I was pulling out the last one I discovered that the entire back of the engine block was covered in oil. I couldn't tell whether it was all coming from the valve cover or not so I decided to just buck up and take the head off like I should have in the first place. Here's what I've found so far... I'm not sure how much of the oil in cylinder #4 spilled in there while I was taking off the head, but that's definitely one source of the oil leak. There may be others. Maybe now would be a good time to pull the engine and do a full rebuild. Then again, maybe not. Either way, I'm gonna need a new head now. -
Nice! Yours was obviously far better cared for by the previous owner than mine was. Great to hear that one in good condition gets the seal of approval from a first time driver who knows the difference. I brought mine home on a trailer, so I had no idea what it would be like to drive. When I finally got it running again, after about 10 minutes of street/highway I came to the conclusion that it was the worst handling vehicle (sports car, truck, minivan, you name it) that I had ever driven in my entire life. I blamed 70% of it on worn out struts and bushings and the other 30% on crappy tires. Gives me a little extra motivation to get mine sorted out.
-
My new (to me) '87 ESI-R in MI
dtownmikebrown replied to dtownmikebrown's topic in Newbie Introduction
Uggh. I went to replace the leaky exhaust manifold gasket and I found a crack in the manifold. Then I broke off one of the studs inside the head. I thought drilling out the old stud and re-tapping the thread would be a fairly easy process, but apparently it's even easier to screw it up. I think I bungled it pretty bad. I'm afraid that if I take off the head now it's going to turn into a big, expensive "while I'm at it" job. I was already planning on building the engine, but I kinda wanted to wait until the summer was over. DMNDSTAR87 and I own 87's. Therefore, 87 is the best year. In all seriousness, I think that in 89 with SHP is probably the best you can do for a starquest in stock form. Good question. I'm not sure what's going on there. When I tested it myself I remember it reading just under 3Ω. I'll have to check it again before I hook everything back up. -
2000 Audi S4 6sp TT stage 1 for nice quest
dtownmikebrown replied to DMC-4OOEX's topic in Cars for sale
How many pedals? A buddy of mine with a really fast B5 was just up in PA this past weekend for some kinda S4 meet. Hear anything about that? -
I'm looking for a solid exhaust manifold with no cracks for an '87. I also need an aftermarket downpipe for the stock turbo with a port for an o2 sensor but w/o a secondary air outlet. Thanks!
-
Still not working...
dtownmikebrown replied to dtownmikebrown's topic in Newbie Question and Answers
Bummer! Should've seen this coming . I started wire brushing off the manifold to make sure there weren't any cracks that I couldn't see underneath all the scale...and of course there were. The outlet from the first cylinder is cracked all the way around the inner side. http://i30.photobucket.com/albums/c331/dtownmikebrown/Starion/man1.jpg http://i30.photobucket.com/albums/c331/dtownmikebrown/Starion/man2.jpg I left it with the most highly recommended welding company in the area. They said they'd "give it a hell of a try." Hopefully it'll at least hold temporarily while I see if sealing off all the manifold leaks makes any difference in how the car runs. -
Still not working...
dtownmikebrown replied to dtownmikebrown's topic in Newbie Question and Answers
I did find a small leak coming from an intercooler hose, but it didn't make any difference when I fixed it. I finally got the exhaust manifold removed. Looks like I was on to something. http://i30.photobucket.com/albums/c331/dtownmikebrown/Starion/ExhaustMan.jpg I'm waiting on some parts right now. We'll see how it does with some new gaskets. -
Still not working...
dtownmikebrown replied to dtownmikebrown's topic in Newbie Question and Answers
Ah yes, the cone filter is long gone. The tank has been cleaned, lines have been flushed, all the filters have been replaced, injectors tested, fuel pressure tested, etc. I'm pretty convinced the fuel delivery is sorted out. I think it's gotta be boost or vacuum related at this point. Sometimes I feel like the inherent design of this car is undermining my attempts to get it running. Like right now, trying to loosen the turbo studs. I torched them, I soaked them in PB Blaster for a day, torched them again, and they still won't budge. Problem is, there's no room to fit a breaker bar or an impact driver in there because the bolts are so close to the turbo housing. Same story with the exhaust manifold studs. There's gotta be an easier way to do it that I'm just not seeing right now. -
Still not working...
dtownmikebrown replied to dtownmikebrown's topic in Newbie Question and Answers
Still no luck. Here's what else I've done. -I had my fuel injectors flow tested -checked the fuel pressure at the TB -fixed the TPS and did the TPS/ISC reset properly this time -replaced the valve cover gasket -replaced the coil and the plugs -cleaned out and re-lubricated the distributor -verified the timing Everything checks out as far as fuel and ignition are concerned. Last night I did a boost leak test and I could hear air escaping from a few different places. The exhaust manifold gasket is definitely bad. It could have been the exhaust manifold gasket in a different place, but I thought I could also hear air escaping out of the side of the turbo closer to the engine. When I started to take things apart to get to the exhaust manifold I could see traces of oil residue inside the intake boot and everywhere in between the turbo and the intercooler. I'm guessing that's not normal, right? Could the exhaust manifold leak be part of what's causing the problem? What do I need to do next? -
My new (to me) '87 ESI-R in MI
dtownmikebrown replied to dtownmikebrown's topic in Newbie Introduction
Been meaning to post this... http://i30.photobucket.com/albums/c331/dtownmikebrown/Starion/injectors.jpg Looks like my cleaning and testing method wasn't so bad. The blue bars are before and the purple ones are after. Still a little bit of an improvement, though. -
I ended up getting it done with a hacksaw, a belt sander, and some JB Weld. Ended up costing me $30 and about an hour of my time when it was all said and done. The only problem with this is that it ruins both units for their intended applications. http://i30.photobucket.com/albums/c331/dtownmikebrown/Starion/tps1.jpg http://i30.photobucket.com/albums/c331/dtownmikebrown/Starion/tps2.jpg The Mazda TPS bolts up at a lot different angle than I originally thought. Luckily I caught it before the epoxy was set. I bolted up the flange that I cut off the original unit and turned it all the way counter-clockwise, then I lined up the Mazda unit with the tab on the TB and turned it counter-clockwise as far as it would go. Then I made a mark on each one to make sure I aligned them properly. Then I waited for the epoxy to finish hardening, soldered up the two wiring connectorrs, did the TPS/ISC reset, and it looks like it's good to go. Didn't solve the problem I'm having, but no more TPS error from the ECU so that's one more thing ruled out.
-
I found a TPS from a late 90's 2.0L Mazda 626 at a local salvage yard. I've read that with a little bit of fabrication they can be good cheap replacements for the OEM version, so I'm gonna pick it up. I know there is at least one vendor that sell nice adapter plates, but I'm on a tight budget right now. Has anyone had any luck making an adapter or seen a good how-to guide?
-
TPS and drivability loss
dtownmikebrown replied to dtownmikebrown's topic in Newbie Question and Answers
OK, I took all the plastic connectors off of all the parts on the throttle body and inspected and cleaned where necessary. The engine is still idling right around 900rpm when warmed up and I'm getting the proper .9v reading from the ISC. I'm getting the same voltage reading from both halves of the TPS connection, but now it's doing some weird stuff. -If I take it off the throttle body and turn it by hand I get readings from 0 to 4.95V, but a few times I caught it sticking at 4.3 and not going any further. Maybe I just found part of the problem right there. -When its attached to the TB I can't get it to go past around 0.2V when it's turned all the way clockwise. I know I've got it positioned correctly because if I open the throttle by hand or put tension on the cable I can get the voltage to go the rest of the way to 4.95V. So it looks like the TPS is malfunctioning intermittently, but why the low voltage at idle?