

FBS
-
Posts
35 -
Joined
-
Last visited
-
Days Won
4
Content Type
Profiles
Forums
Calendar
Gallery
Posts posted by FBS
-
-
Hi Everyone....
Well now that I made it across the country safely to Tennessee.. Car ran superbly... used no oil... no problems.
I am looking into something that has been there for some time but I have no idea what it is. When ever I shift gears I hear this very slight knock sound depending on how I smoothly I let the clutch out. If I am really smooth with the clutch I dont hear it all. There is not problem shifting in the transmission.. It sound like its coming from the back some place. I need to get it up on a rack some place so I can take a look. My first guess is that the torque tube rubber bushings are worn.. but thats a complete guess. If anyone has any ideas I would love to know. Thanks
-
Hi Ya'll, Well I completed a cross country trip from Oakland Oregon to Nashville Tennessee in my car. 2600 miles. I managed to do it in 3 days. I stopped in Idaho and in Nebraska to stay the night. The car performed flawlessly. In fact it did not use any oil the entire trip. I had the oil changed the day before I left and after all those miles...still same amount. The car got pretty warm in Idaho but all the fans worked flawlessly and there was never any problem. I will say that the seat was not so comfortable for all those miles.
Well I am living now in Nashville area.. wonder if there are any other members in this area.... ?
Send me a message if you live near here maybe we meet up some time...
Fionnbharre
-
 3
3
-
-
On 5/12/2023 at 8:41 AM, Tim_C. said:
I would never run both fans all of the time. That's a band aid on a broken arm. With a properly working cooling system, you rarely need the first fan, let alone the 2nd. Fix whatever problem is causing the temp to rise before touching anything else.
At most, you can run the 185 thermosensor in both locations or wire the secondary to come on with the primary but I never needed that after having the radiator professionally gone through.
I would tend to agree with you on this. I talked to my father who I got the car from.. He had the entire cooling system cleaned out before I got the car. The car never overheated. Radiator looks really clean. Thanks for your input on this.
-
22 minutes ago, kev said:
Good to hear. Although, I don't know what the manual switch gives you. By the time you realize it is getting too hot and need to flip the switch, it may be too late. Remember, it takes a bit of time for the gauge to register the increase in temperature. Why not buy two new 'primary' t-stats, install them, connect them together and then to the secondary fan only and keep the primary grounded at all times. Or vice versa for that matter (like techboy mentioned). This way one would be on for sure and the other would have to have two t-stat failures before it would stop working.
Another thing that I never really experimented with is that the automatic cars have a better secondary fan. It is closer to the primary fan design. I never really noticed this until recently despite owning two automatic cars over the years. Someone mentioned it on here and the light bulb went off in my head haha. There had to have been a reason why the automatics had a different secondary fan than the manuals. On a similar note, I never understood why the AC condenser was a different design between autos and manuals as well.
kev
I put the manual switch on it because the cooling system is actually in really perfect shape other than that one thing...There is not a real need to run both fans all the time..I will use it when I have to come up the hill I drive up that is the only time I see any real change in engine temp. It does not have to make sense to everyone else.. I get why it seems pointless.. but not for me... I appreciate all your valuable input..
-
On 5/3/2023 at 7:19 AM, kev said:
For now, immediately unplug the wires going to the t-stats and ground them (well at least to the secondary that you know isn't functioning). This will make the fans run at all times when the key is ON. Don't drive it any further until you do that...you know you have a t-stat issue and it isn't worth cracking the head. Yes, replace the t-stats and consider at least what techboy has provided (ground the secondary fan). I, personally, would just leave both grounded and running all the time. One of my cars has been running like that since 2002 (two owners later, it still is wired the same). If you insist on using the stock t-stats, connect a wire between the two t-stats....thus if either one fails, the other will still turn on both fans. The factory electric fan setup is a design failure on our cars IMHO. You can address this easily by what we are saying without altering the stock appearance of the engine bay.
Also, the 'mod' I suggested isn't a mod. It's simply resorting to the much more reliable setup on the earlier model starquests (83/84). I've never had a cracked head on a car running the factory earlier model clutch fan setup. You would need the fan shroud out of an 83/84 starquest and the clutch fan itself out of the same years or from any 80s Montero or Mitsubishi pickup (they had the same fan but a different shroud). The only difficult thing is that the later model radiators had the three brackets brazed to them to mount the electric fans (two small ones on the bottom tank near the t-stats and one larger double bracket on the top tank in the middle). Just a little heat from a propane or MAP torch and the brackets come off the radiator without damage and could easily be soldered back on later down the road. The clutch fan shroud simply bolts on with the four bolts on the sides of the radiator (same ones used on the other sides of the electric fans). For the clutch fan itself, just remove the four bolts holding the water pulley pump. Remove the flat plate over the pump pulley and bolt on the clutch fan. The water pumps all have provisions for clutch fans even for electric fan cars (they have the 'nub' that protrudes into the fan to engage the clutch). The 83/84 models used studs instead of bolts on the water pump connection. Studs make it easier to mount the clutch fan but I simply reuse the four original bolts. I should note that the 83/84 clutch fan shroud is two pieces. You bolt the lower half on the radiator first (the radiator doesn't have to be out of the car or even disconnected). Then put on the clutch fan and, last, bolt on the top half of the shroud. The top half is easier with the upper radiator hose disconnected but you can still get in there with it connected.
Again, don't even start the vehicle until you get that secondary fan working (Ground the wire...takes less than two minutes)! I can't stress this enough! Take this from a guy who has been driving these cars for over 30 years and has cracked many cylinder heads (yes, I've cracked a head without ever noticing an increase in temperature on the stock gauge). I'm so paranoid about this that I've wired the fans to ground on the day of purchase of starquest in the former owners driveway before driving it home....he looked at me like I was crazy!
kev
Hey Kev... thanks for the inspiration... I decided to take your advise. I grounded both fans with one little change. I added a simple switch inline on the second fan so I can turn it off if I want to. When in off position it is defaulted to normal operation. I replaced the Thermoswitch and it works correctly. Cheaper to replace fan than head and a lot less work. Thanks for your effort and sharing your experience.. I really appreciate it.
-
On 5/1/2023 at 6:18 AM, kev said:
Over the years I found that if I was retaining the electric fans, I ALWAYS ran both hot, at all times, by grounding both lower wires that went to the t-stats. My view is that I'd rather tax the alternator than risk overheating. These t-stats always fail with time. As we all know, it doesn't take much overheating to crack these heads.
But my advice is to dump the electric fans and use an early model clutch fan setup. I've had no issues with failing fan clutches in over 30 years, never have overheating issues, etc. Although if you have an aluminum radiator (cxracing, etc.), then using the clutch fan/shroud is a bit more difficult. There was a member here who figured out how to do it, but his thread was lost in the database issue.
Hi Kev... thanks for your reply... The thing is that everything is working really well on the car. I dont really want to re-engineer the car just yet. But I see what you are saying. The #1 fan never comes on while driving on the highway...which is 90% of what I would drive, even when it was 95Degrees...Coolant temp is not reaching 185Degrees so car is staying pretty cool. Anyhow I think the least I will do is get new thermostats.. for both fans.
-
That makes sense to me. I noticed yesterday while I was driving that even though the outside air temp was about 95 Degrees... the cooling system temp gauge was only slightly warmer than normal when the outside temp is in the 60's to 70's. I like Texas Quests idea, I am wondering how that worked out. That would mean both fans come on at the same time. But still I also wonder if thats how Mitsubishi designed it why change it as long as its working correctly. I have never seen the primary fan come on other than me driving up my driveway which is steep and I dont go to fast. It did not even come on while driving around town at 95Degrees air temp.
-
Hi everyone, things are going well with the car. Summer is near and I am planning on taking a bit of a drive. The cooling system has been flushed recently, car does not appear to have any overheating problems. There is one thing though that bothers me. I have a long steep 1 mile driveway. Usually by the time I get to the top, temp needle is half way up and #1 cooling fan is on.
i have yet to see the secondary fan cut in. I check the fan motor and the motor relay and both work perfectly. I have not checked the secondary fan Thermoswitch. When does this fan kick in? At what temperature. I’m considering installing a oil temp and water temp gauge so I can see the temps. Can anyone enlighten me on the secondary fan operating characteristics? Is there a way to test is complete operation? I have factory manual and could not find any definitive language on cut in temp and function. Maybe I am looking in the wrong area. BTW I have both manuals. Any help would be appreciated? -
Thank you Jimmy.... much appreciated. I did not know that, I have 2 more TPS's to try out... I suppose if I have the same problem, Mike has a good solution though. I did go looking for alternatives and I found this...
I wonder if anyone has investigated this.,... It looks identical except for the connector... and its for a 2.4Liter motor..
Fionnbharre
-
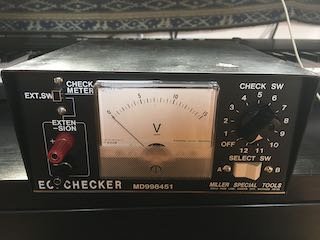
Ok.. so I hooked up the ECI checker to the system and it worked perfectly. I was able to read all the components in the system that I can read. I discovered a couple of things that may be a problem but I am not sure about it.
It picked up that the Air Temp Sensor was sitting at almost 5 volts when it should have been about half that. I did a Ohm resistance test on that sensor directly using a controlled temp heat gun and a voltage test. The voltage test was strange. It would stay at 5 volts while I applied the heat gun temp at 170 Degrees and then suddenly jump to about .9 to 1. volt.. sometimes it would swing back and forth.. and when I removed the heat it took a couple minutes to change but it went strait to 5 volts after dropping slightly. The Ohm test seemed to show that it was closer to the correct specifications but not exactly. Its difficult to test it for the cold, all I could do was put it in a freezer for a few minutes and then take it out and read it. It was close to the correct value.
The second thing that was off was the EGR Solenoid Valve voltage.... It was 0 the entire time.. nothing I did rpm wise changed it.
The O2 sensor seemed off but when I replaced it with a new one I got the same results and it states that the testing of that sensor is also subject to other things so it may not be accurate.
I tried checking the Self Test which is that harness located behind the side of the glove box when you open it... I checked it in the correct way and I only got the standard battery type voltage showing no errors. This corresponds to what the ECI Checker also told me ...except that it did not say the Air Temp Sensor was bad... or had an error. It also showed no error for O2 sensor.
I did manage to reset the TPS/ISC... The car idles at around 950rpm. TPS is at .5volts... MPS... is .9 volts.
So.. the car still does not run correctly.. meaning this. While pushing foot down on the accelerator pedal I can push it down slowly and the engine does not change until I get it down far enough. In that in between space there is a little what feels like a sputter... and then suddenly... the engine rpms pick up and catch up. It seems like the TPS is not telling the computer what its doing... thats my guess. but when I checked it on the Checker.... I watched it at .5 volts.. and then when I put my foot down it went to 4.5 volts.... Hmmm as I am writing this I realized I did not check and see if it was a smooth transition from .5 to 4.5 Maybe its not working correctly. The car seems jerky when driving down the road....when your foot is not accelerating .....
I have not tried to see how it starts when cold yet... tomorrow, but it did run with the Temp sensor hooked up correctly. I used the reset procedure that is on this forum...
When I connected the temp sensor back to the sensor that is mounted up front of the radiator This is a jury rigged sensor.) the problem stops.. because its cooler and getting a different signal to the computer telling it to send more fuel.
Lastly as I stated once before that my father installed a Cam in this when he replaced the head and put a non jet head on it. He said after he did this it never ran correctly any more. He also replaced the injectors that look like they are from MotoCam.... but I am not sure. I know this one mechanic that told me that when people put cam's in cars that do not have adjustable EMS they have problems. Maybe this is the cause of why it does not run right.
I am curious what any of you might have to say about this
-
On 2/13/2023 at 3:10 AM, admin_JAinsworth said:
I noticed you said the TPS is 4.74 volts and won't go to 5 volts. It should be .5 (point 5) not 5.0 volts. Have you checked the resistance of the CTS ( coolant temperature sensor)? The resistance check procedures can be found in the FSM on page 14-64 which is the fuel system section. Here is a link to an online manual for the fuel system:
Jimmy
Ok... so I have to share my gratitude for Jimmy here... He unknowingly did me a HUGE favor. He posted this link to the Conquest Service Manual... The ECI Checker and Harness numbers are different in this manual than in the one I own for the 87 Starion. When I originally searched for those parts I used the ones in my manual and was not able to find the Harness because it had a different number. Jimmy had posted this so I download it on my computer. Last week when it came to me to take another look for those tools again I looked at the PDF Conquest version. First try on Ebay I found both... At the time I did not realize they were different numbers but are the exact same tools. I purchased them and only when I received them I checked them against the parts in the Starion manual... and got a rush of OH CRAP I ordered the wrong thing... after a short consultation with Texas Quest and my own digging.. I know they are the same tools, just different numbers... So Jimmy thank you for doing what you did and sharing that PDF with me.... otherwise I never would have found the ECI Checker and the correct harness... like the one in million... Some day I plan on changing out that system but until then I have something now to help me out that corresponds with the the procedures in the manual.... He won the day for me...
-
For a price you can still have one....
Or here
https://www.freedomracing.com/eci-checker-md998451-u.html
Last I checked with them they still had it....
But the correct cable that I was able to find might be harder to find... you need the " A " Cable....
-
What design software are you using... maybe I can help... I use Fusion 360.... I used to use Sketchup and sometimes still do for certain things.. but I have found Fusion 360 to be very useful.. Its really good for a first design... I cannot say my first things were ever that good... Do you have 3D printer access??
-
Well... It arrived yesterday and I am impressed. Its in basically NEW condition. It does not even look like it was ever used. All the cables are in new condition and connectors too. I have done some reading up on new ECU modules and systems and while I would like to go that route sometime... now is not feasible. I found this on Ebay for $75.00... and the correct cable amazingly for $15.00.... Cable is coming today. Finding that cable is like finding a needle in a haystack I think... Anyhow.. we shall see how it goes.
-
1
-
-
Hey thats brilliant Tux... I also do a lot of 3D printing design stuff myself... I looked at the file... very nice job there. !!
-
Thank you... appreciate your help.... not sure which way I will go...
-
HI Kev, Jimmy
Ok I get your confusion.... Some time back my father changed out the head and cam and put in a high performance cam and when he put it back together he had the problem I have now. In a different thread here I mentioned this. Someone said the cam would not cause the problem I have. So in an effort to solve it he connected a couple of wires to the connector for the CTS and extended it to mount it in front of the radiator in the grill of the car in the cool air stream. I know its not correct but thats what he did. I got the car and now I am trying to remedy these problems so it runs correctly. He discovered that when he did this the car would idle and have a richer mixture because he was fooling the ECU.
I dont know what to say about what the fuel pressure regulator... Its brand new..out of the box... Car runs fine down the road and plenty of power ect... so I dont know why it would not have enough fuel pressure to idle.... I had borrowed a fuel pressure checker from Autozone... and somehow it actually failed while I was using it.. It was hooked up where the fuel filter outlet banjo bolt goes, so I never checked it after that. ( this was on the old fuel pump that I was checking the pressure, I never checked it on the new pump..no reason to. The reason why I replaced the fuel pump was I was having other problems not the same as these, those problems no longer exist..( car now starts, correct acceleration under a load, no sputtering ect. )
The connector to the CTS is the original one.
I put in a brand new fuel pump too... so no ideas on this. I also checked and replaced all the filters between the tank and the throttle body including the little tiny one before the fuel pump in the hose. It has had this problem ever since he replaced the cam and the head. I dont know what he did when he took it apart... BTW my father took excellent care of this car... like to the point of writing down every last detail of the parts he changed ect in the owners manual. He changed the oil religiously.. followed all the factory suggestions. He did lots of work on the car to keep it in the condition it is in today. The interior is like new...
My goal is to just get it back to running correctly. I may put the original cam back in but I wanted to see if I could remedy this problem without doing that first.. I apologize if what I write is sometimes confusing... doing the best I can.. with what I know... my knowledge on this car is minimum. No experience on computer driven fuel injection... my other car is a 1989 Mazda B2200...non fuel injected, which I am in the middle of trying to remedy a problem with burning oil like crazy after I changed out the head and put a new head on...like new compression and power so I am confused.. I got my hands full. Appreciate all you here, really I do... I have no car friends... you know guys to call to come over and help me so all your help is really appreciated... more than you know.
Thanks
-
Thank you for both of these replies Jimmy Texas Quest and Kev so appreciate your taking time to respond. I took the CTS that was out in front of the radiator and did the test in the manual with a thermometer and meter. It checked out perfect. I took the one out of the manifold and installed the one I checked. I have not checked the one I removed yet, but I know now I have one that is correct and working in the car. I tried starting the car... same issues with not rich enough mixture. When I was checking the fuel pressure regulator I did something to see if I was having issues with the valve that regulates the pressure. I put a pair of vise grips on the return to tank line... The instant I did this the engine rpm picked up and smoothed out like when you have a high idle car warming up scenario. Release the pliers... back to same issue. I took this as that I increased the pressure a bit and was getting more output from the injectors... Not a fix and not sure what I may damage if I do that but it told me what I think was happening in the engine. ( I did this after I installed the new pressure regulator.)
What about the air temp sensor in the MAF...
On a side note I was able to find a ECI checker MD998541.... and amazingly the proper harness... MD998452 ( which I had looked for a couple of weeks ago on ebay but no luck.) I checked yesterday and by golly it was there... $15.00... Checker was $75.00... The checker looks in good shape as well as the harness. If this thing works it might make this process easier.... it was worth a try. I will let you know what happens....
-
I need some help trying to understand what is going on here..
I have this problem with what appears the car not getting enough fuel to idle and the mixture being to lean. I mentioned this in another thread but it was confusing so I will try again here.
When you try to start the car when it is cold... it will start but not idle... I have to keep my foot gently pulsing on the gas to keep it going until its warm. once its warm it hangs out around 1500rpm.
The only way it will idle is if the wires that normally go to the temp sensor that tells computer what the engine coolant temp is are hooked up to a separate Temporary temp sensor mounted up in front of the radiator which is constantly sending message to computer that its cool and therefore richen the mixture. If I hook it up to the one on the engine it wont idle.
I have replaced the following parts
Fuel Pump, Fuel Pressure Regulator, Distrubutor Vacuum unit,
I took off the connectors on the injectors and cleaned them.. they looked ok anyhow but just trying to rule out any possibilities.
l checked the output of the MPS... it was .91Volts. I had my wife turn off the key and turn it back on... it went to 1.45 volts... and then after 15 seconds back to .91volts... I did this 3 or 4 times and it was consistent. I can hear the little motor working so it seems fine.
I checked the output of the TPS.. and adjusted fully counter clock wise its at 4.74 volts. I could not get any more . I have a spare TPS and checked it with that one and got the same voltage. When depressing the throttle... drops down to just over a volt and then back to 4.74 volts after releasing it.
I tried the TPS/ISC procedure linked below both parts. The second method it does not say what screw to adjust but I assume its the ISC screw since in the factory manual its what is adjusted. When the wires to the Temp Sensor are plugged into the sensor on the engine no matter how much I tightened the ISC screw it never changed the engine rpm. As soon as I plugged it in to the one the is located in front of the radiator that is temporary the engine rpm increased dramatically and I loosened it to drop rpms.
From what I can tell something is telling the engine to make the fuel mixture leaner... when it should not be..... I checked the Ohm's on the temp sensor on the block and it is the same as the temporary one in front of the radiator.
What else controls the idle mixture or fuel mixture. My dad told me that he at one point he checked the plugs and they looked like the engine was running to lean... thats why he moved the temp sensor into some cooler air. I notice when I park the car after I drive it and the warm air get to the sensor up front when I go to start the car the rpms are down around 1000.
I thought about checking the primary injector... maybe its clogged some.. but the car runs fine down the road... so that does not make sense maybe?
The last thing that came to me was the O2 sensor.. maybe its telling the computer that mixture is to rich because something is wrong with it. I have not checked its output yet... thats next...
What about the MAF... telling computer not enough air... lean out the mixture ? I have not checked that output yet.
Does anyone have any ideas... or something I have overlooked... ?????
Thanks
FB
https://www.starquestclub.com/forum/index.php?/forums/topic/28069-tpsisc-reset-87-89/
-
Hi... I found this place online in Japan that sells Starion parts... I am looking for weather stripping for drivers side door. I could not find it anywhere else... It looks like the weather stripping is available. Does anybody know of a USA parts supplier for this...
I also make some inquiry about some other parts... namely... Vacuum advance... and a couple other parts...
https://www.nengun.com/oem/mitsubishi/mb177401
Thanks
-
20 hours ago, psu_Crash said:
I'm sure I have at least 3 of these collecting dust. I'll try to remember and take a look tonight. If I do have a good one it's your for the price of shipping.
Edit: Says they have them in stock here. Who knows if that's accurate though.
https://www.mitsubishipartswarehouse.com/oem-parts/mitsubishi-distributor-advance-md611360
Ok... called them and result is they dont have it either.... ghost part... Thank you for your kind generosity... but since I managed to find the one that was hidden I wont probably need one... for a while.... the one I took off made it over 200,000 miles... I think what has happened to the old one is the rubber diaphragm is stiff.... Thanks again for you kindness...
")
-
1
-
-
Hmm... well... when I got the car it came with several boxes of parts... all kinds of stuff. I had looked through it all and thought I had one of those in there... Last night after I discovered it was bad I went digging.... 3 times I went through all of it.. even had my wife help me. I. could not find one.... so I came begging here to see if I there were any other options. Got up this morning and said ok one more time.... I decided I was going to empty everything out and sort it all out. I must have missed this one box. Opened it and there it was... brand new.... Vacuum advance after all. I apologize for the mix up.. but we did learn one thing.... this part is very short in supply.... it appears. psu_Crash had a good idea though... adaptation...
Its actually not hard to make things like this with a 3D Printer.... I am expert at CAD drawing parts from existing parts. If anyone here ever needs some little plastic part or something let me know...I will see what I can do.. once I make the drawing... its just print. I am going to take the old one apart I think..see how it goes together. Does anyone know what the little hex nut on the top of it does..?
I did take the car out for a ride after fixing this and its not the same car it was before... it used to have this jerk like the engine stopped momentarily when you stomped on it.. thats gone... and it is so smooth now through the gears...
So thats 3 things now I have fixed... Fuel pump, Fuel Pump pressure Regulator.. and the vacuum advance.... Next the ISC...TPS idle thing... hard to start when cold and the idle goes up and down until it gets warm... seem the engine is starving for fuel.. not rich enough..
Thanks to everyone for responding... I will check out the last possible. place and report back.
-
2
-
-
Yes I sent him and email... He replied that he does not have it either.... Its got me thinking about how hard would it be to make one... I do have a 3D printer.... and materials that will hold up in that environment... just not sure how it all works.. I cannot quite see it in my mind, but I guess would have to take one apart and reverse engineer it.
Shifting Noises
in Virtual Mechanic
Posted
Hmm you seem like you know a bit about this. What exactly in the spline part is the cause of the clunking sound? Is it wear or lack of lubrication. Is it this part
https://mksmotorsport.com/product/pre-order-torque-tube-flange-male-pinion-side/
How difficult is it to remove the torque tube assembly? The bearing you mentioned... any ideas where I might find one?
Thanks